Next: 3. Measurement of Debye-Scherrer Photographs Up: The Study of Metals and Alloys Previous: 1. Introduction
![[IUCr Home Page]](/iucr-top/logos/iucrhome.gif)
![[Commission Home Page]](/iucr-top/logos/cteach.gif)
![]()
![]()
![]()
Next: 3. Measurement of Debye-Scherrer Photographs
Up: The Study of Metals and Alloys
Previous: 1. Introduction
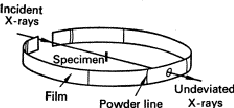
The simplest method involves the use of a Debye-Scherrer camera . This consists essentially of a light-tight cylindrical enclosure which holds a strip of X-ray film (Fig. 1) accurately on its perimeter. The specimen has a diameter of about 0.3 mm, must be accurately on the axis of the cylinder, and must be rotated about its axis so that the randomness of the particles of powder shall be as great as possible and also because Laue spots should not occur. The specimen should be made by filing or otherwise grinding the metal to a fine powder (< 0.1 mm), and then annealing it to eliminate the effects of cold work; it is then filled into a fine tube of boro-silicate glass. Alternatively, it can be made into a paste with an adhesive such as Canada balsam and spread on a weighted hair.
 |
A fine beam of X-rays is produced by passing the beam through a metal tube about
0.5 mm in diameter. Much shorter exposures can be obtained by using rectangular
holes about 2 mm ![]() 0.5 mm; along the centre line of the film, this does
not give appreciably broader lines than a circular hole. The slit system must
be thin enough to allow the observation of lines up to Bragg angles of
85
0.5 mm; along the centre line of the film, this does
not give appreciably broader lines than a circular hole. The slit system must
be thin enough to allow the observation of lines up to Bragg angles of
85![]() .
.
Several types of Debye-Scherrer cameras are commercially available.
Much present-day work uses counter diffractometers instead of film, as these give more quantitative results. It is however wise to use photographic methods first, as a complete survey of a diffraction pattern may be more informative than a diffractometer trace. This article will be concerned only with photographic methods.
There are also other photographic methods available, such as the Guinier focusing camera , but these should be used only in special circumstances.
Copyright © 1984, 1998 International Union of Crystallography
IUCr Webmaster