The study of metals and alloys by X-ray powder diffraction methods
H. Lipson
1. Introduction
Classically, the two main ways of studying metals and alloys were metallography (the examination of polished and etched surfaces) and cooling curves (looking for discontinuities that indicated some sort of phase change). Both these methods involved considerable skill and experience, and the results were not always unambiguous. The introduction of X-ray diffraction provided a much clearer, simpler and more objective way of investigation.
The methods also led to an understanding of atomic arrangements and so they are more fundamental; they led to the present-day theory of the nature of the solid state, but this article will not be concerned with this subject.
2. The method
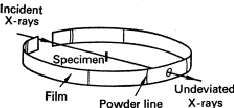
The simplest method involves the use of a Debye-Scherrer camera. This consists essentially of a light-tight cylindrical enclosure which holds a strip of X-ray film (Fig. 1) accurately on its perimeter. The specimen has a diameter of about 0.3 mm, must be accurately on the axis of the cylinder, and must be rotated about its axis so that the randomness of the particles of powder shall be as great as possible and also because Laue spots should not occur. The specimen should be made by filing or otherwise grinding the metal to a fine powder (< 0.1 mm), and then annealing it to eliminate the effects of cold work; it is then filled into a fine tube of boro-silicate glass. Alternatively, it can be made into a paste with an adhesive such as Canada balsam and spread on a weighted hair.
 |
A fine beam of X-rays is produced by passing the beam through a metal tube about 0.5 mm in diameter. Much shorter exposures can be obtained by using rectangular holes about 2 mm ![]() 0.5 mm; along the centre line of the film, this does not give appreciably broader lines than a circular hole. The slit system must be thin enough to allow the observation of lines up to Bragg angles of 85
0.5 mm; along the centre line of the film, this does not give appreciably broader lines than a circular hole. The slit system must be thin enough to allow the observation of lines up to Bragg angles of 85![]() .
.
Several types of Debye-Scherrer cameras are commercially available.
Much present-day work uses counter diffractometers instead of film, as these give more quantitative results. It is however wise to use photographic methods first, as a complete survey of a diffraction pattern may be more informative than a diffractometer trace. This article will be concerned only with photographic methods.
There are also other photographic methods available, such as the Guinier focusing camera, but these should be used only in special circumstances.
3. Measurement of Debye-Scherrer photographs
The pattern of lines on a photograph (Fig. 2) represents possible values of the Bragg angles ![]() which satisfy Bragg's equation.
which satisfy Bragg's equation.
| (1) |
Here ![]() is the wavelength of the X-rays and dhkl is the spacing of the planes (hkl). (Note that the usual symbol n is missing; the second order of reflection from the (111) planes is designated 222.) We require to derive the values of
is the wavelength of the X-rays and dhkl is the spacing of the planes (hkl). (Note that the usual symbol n is missing; the second order of reflection from the (111) planes is designated 222.) We require to derive the values of ![]() from the photograph.
from the photograph.
Three methods are illustrated in Fig. 3. For the Bradley-Jay method, the exposed part of the film is limited by knife-edges, corresponding to a Bragg angle, ![]() , of about 85
, of about 85![]() (Section 2). This angle must be accurately known; it can most conveniently be found by centring the camera on the table of an optical spectrometer and focusing the cross-wire of a fixed microscope on one of the edges; the camera can then be rotated until the other knife edge coincides with the cross-wire. If the angle through which the camera is rotated is
(Section 2). This angle must be accurately known; it can most conveniently be found by centring the camera on the table of an optical spectrometer and focusing the cross-wire of a fixed microscope on one of the edges; the camera can then be rotated until the other knife edge coincides with the cross-wire. If the angle through which the camera is rotated is ![]() , then
, then
 |
(2) |
To find a Bragg angle ![]() for any pair of lines, we measure the distance S between the lines and the distance Sk between the knife-edge shadows; then
for any pair of lines, we measure the distance S between the lines and the distance Sk between the knife-edge shadows; then
| (3) |
The second method - the van-Arkel method - is rather better for high-angle lines; these are closer together than with the Bradley-Jay method and so less influenced by possible irregularities in the film.
We now have
| (4) |
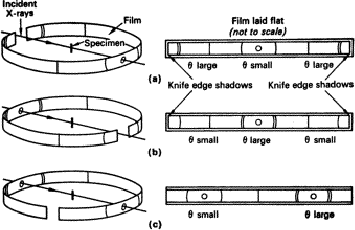 |
The third method - the Straumanis method - has the advantage that no calibration is required; the positions on the film corresponding to ![]() = 0
= 0![]() and
and ![]() = 90
= 90![]() can be found from the measurements of pairs of lines. This advantage however is somewhat illusory. Calibration need be carried out only once for the other two methods, whereas it has to be carried out each time for the asymmetric method; moreover, the calibration then depends upon the quality of the lines on the film and so extra errors may be introduced.
can be found from the measurements of pairs of lines. This advantage however is somewhat illusory. Calibration need be carried out only once for the other two methods, whereas it has to be carried out each time for the asymmetric method; moreover, the calibration then depends upon the quality of the lines on the film and so extra errors may be introduced.
All three methods take account equally well of changes in film dimensions during processing. It has to be assumed that changes - usually shrinkage - are uniform and this is probably true to a reasonable accuracy. Only the first two methods are recommended - the first for ordinary interpretive work (Section 4) and the second for high accuracy in lattice spacings (Section 5).
4. Interpretation of powder photographs
We must first have the values of ![]() for all lines on a powder photograph, and, if the number is large, assigning indices hkl to them all may be difficult. Fortunately, many metal and alloy structures are so simple that their powder pattern can be recognized at a glance. Our first task is thus to familiarize ourselves with these patterns.
for all lines on a powder photograph, and, if the number is large, assigning indices hkl to them all may be difficult. Fortunately, many metal and alloy structures are so simple that their powder pattern can be recognized at a glance. Our first task is thus to familiarize ourselves with these patterns.
The three most common structures are called face-centred cubic (f.c.c.), body-centred cubic (b.c.c.) and hexagonal close-packed (h.c.p.). They are illustrated in Fig. 4. The sequence of lines - in position and intensity - is characteristic of each structure and the scale of the pattern gives the dimensions of the unit cell; the smaller the scale of the pattern, the larger is the unit cell. Therefore there are more lines for a larger unit cell.
 |
4.1 Cubic structures
For a cubic structure only one quantity is involved, the cell edge or the lattice parameter.
Equation (1) can be expressed in the form
| (5) |
From the observed values of ![]() , a table of values of
, a table of values of ![]() should be prepared. For a cubic structure these should be in simple numerical proportion. The highest common factor should be
should be prepared. For a cubic structure these should be in simple numerical proportion. The highest common factor should be ![]() /4a2, and hence a can be derived. (There is an exception to this rule which will be discussed later.)
/4a2, and hence a can be derived. (There is an exception to this rule which will be discussed later.)
Not all values of h2 + k2 + l2, which we shall call N, are possible. For example, there are no three numbers whose squares add up to 7, or, in general, to p2(8q - 1) where p and q are integers. Numbers such as 7, 15, 23, 28, 60 are said to be forbidden. The absences of numbers such as these are useful in checking the correctness of indexing for a large unit cell.
For small values of N, the values of h, k and l are easily deduced. Thus N = 1 corresponds to 100, 2 to 110 and 3 to 111. For some values of N, more than one set of indices exists: 9 is both 300 and 221. For values of N (up to 100) see Lipson and Steeple (1970) Table 5.
The intensities of the lines depend upon the arrangement of atoms in the unit cell, but they also depend upon the number of possible ways of combining the indices - the multiplicity factor. For simple structures, this factor is dominant. Thus 100 includes 010, 001, ![]() 00, 0
00, 0![]() 0, 00
0, 00![]() ; the multiplicity factor is 6, corresponding to the six faces of a cube. For N = 14 (321) however there are 48 arrangements, and line 14 will usually be much stronger than line 1, even if the decrease in intensity with
; the multiplicity factor is 6, corresponding to the six faces of a cube. For N = 14 (321) however there are 48 arrangements, and line 14 will usually be much stronger than line 1, even if the decrease in intensity with ![]() is allowed for.
is allowed for.
If the lattice is not primitive, some values of N are not possible. For the lattice F (face-centred), the indices must be all odd or all even: thus the first few lines are N = 3(111), 4(200), 8(220), 11(311), 12(222), 16(400)![]() These are shown diagrammatically in Fig. 4. For the body-centred lattice, I (Innenzentiert), N must be even, and so the possible lines are 2(110), 4(200), 6(211), 8(220), 10(310)
These are shown diagrammatically in Fig. 4. For the body-centred lattice, I (Innenzentiert), N must be even, and so the possible lines are 2(110), 4(200), 6(211), 8(220), 10(310)![]()
This raises the difficulty mentioned earlier: for a body-centred structure the common factor is 2![]() /4a2 and not
/4a2 and not ![]() /4a2. We can make use of the forbidden numbers to deal with this problem: if a line appears to have N = 7, we know that it is not so; the line is probably 14 and the structure body-centred.
/4a2. We can make use of the forbidden numbers to deal with this problem: if a line appears to have N = 7, we know that it is not so; the line is probably 14 and the structure body-centred.
4.2. Tetragonal and hexagonal structures
For tetragonal and hexagonal structures an extra variable - the axial ratio, c/a - is involved and therefore the problem is more complicated. For tetragonal structures, eq. (5) is replaced by
| (6) |
Now no precise rules can be given, but the values of sin2 ![]() may give some hints. For example, if l = 0, the values of sin2
may give some hints. For example, if l = 0, the values of sin2 ![]() are in the ratios 1, 2, 4, 5
are in the ratios 1, 2, 4, 5 ![]() corresponding to indices 100, 110, 200, 210
corresponding to indices 100, 110, 200, 210![]() If we find a set of values in these ratios we can assume that the indices are as shown, and then we have to find l from the lines that are not in this sequence. The ratio 1:2 particularly should be looked for.
If we find a set of values in these ratios we can assume that the indices are as shown, and then we have to find l from the lines that are not in this sequence. The ratio 1:2 particularly should be looked for.
For hexagonal structures, or trigonal structures referred to hexagonal axes, eq. (5) is modified to
| (7) |
4.3 Systems of lower symmetry
Equations for orthorhombic, monoclinic and triclinic systems are more complicated. A general method for dealing with them has been devised by Ito and is amenable to treatment by digital computers; a description of it is given by Lipson and Steeple (1970). But there is no method that can be guaranteed to give an unequivocal answer; some lines may overlap and so cannot be measured accurately, and there will always be odd coincidences which will mislead. The only safe way is to try to obtain a single crystal, deduce the cell dimensions from it and calculate all the possible values of sin2 ![]() .
.
5. Accurate cell dimensions
Having found the unit cell, for many purposes in the study of alloys we need to know the cell dimensions as accurately as possible. It is fortunate that such accuracy is possible with remarkably few precautions. For very sharp lines, the separation of an ![]() doublet (
doublet (![]() and
and ![]() ) can be measured to about 1 per cent, and since the separation itself is about 0.25% of the wavelength, an accuracy of about 25 ppm should be attainable. This arises because the accuracy depends upon sin
) can be measured to about 1 per cent, and since the separation itself is about 0.25% of the wavelength, an accuracy of about 25 ppm should be attainable. This arises because the accuracy depends upon sin ![]() , which varies very slowly near
, which varies very slowly near ![]() = 90
= 90![]() ; it is for this reason that lines with
; it is for this reason that lines with ![]() near to 90
near to 90![]() should be observable (Section 2).
should be observable (Section 2).
We can derive the value of a cubic crystal from any line, by means of eq. (5). The answer would not however turn out to be constant because of certain systematic errors, but the error, as we have seen, will be less for lines with high ![]() . We can make use of this phenomenon by finding the values of a0 from all the lines in a photograph and extrapolating the results to
. We can make use of this phenomenon by finding the values of a0 from all the lines in a photograph and extrapolating the results to ![]() = 90
= 90![]() . The only problem is to decide what function of
. The only problem is to decide what function of ![]() should be used to give a straight-line extrapolation.
should be used to give a straight-line extrapolation.
Several functions - ![]() itself,
itself, ![]() ,
, ![]() - have been suggested, but it is now generally accepted that the Nelson-Riley function (
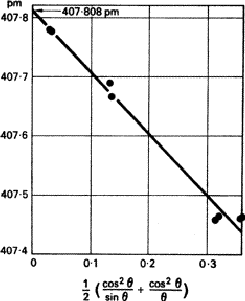
- have been suggested, but it is now generally accepted that the Nelson-Riley function (![]() ) gives the best results. It is tabulated by Lipson and Steeple. A typical example is given in Fig. 5. It cannot be too strongly emphasized that at least one line should have
) gives the best results. It is tabulated by Lipson and Steeple. A typical example is given in Fig. 5. It cannot be too strongly emphasized that at least one line should have ![]() > 80
> 80![]() ; extrapolation over a large range is unreliable. It may even be necessary to find a
; extrapolation over a large range is unreliable. It may even be necessary to find a ![]() radiation that gives such a line.
radiation that gives such a line.
 |
Cubic crystals are the easiest to deal with. For lower symmetries extra problems arise. Complete rules cannot be given here, but basically the principle is to use lines with high h index for a, high k index for b, and high l index for c. Complete details of suggested procedures are given by Lipson and Steeple.
6. Phase diagrams of binary alloys
We now come to the main purpose of this article - the application of the foregoing methods to the study of phase diagrams.
A binary alloy can have four different types of constitution:
(a) A mixture of two immiscible phases (fortunately this is rare).
(b) A single phase in which atoms of both sorts occupy positions on the same lattice - a solid solution.
(c) A phase with structure different from that of either of the constituents - an intermetallic compound.
(d) An intimate mixture of two phases - a two-phase alloy.
There cannot be more than two phases in equilibrium in general.
Solid solutions are very common. If they include one of the elements they are said to be primary; otherwise they are secondary. If the two elements have the same structure, such as copper and nickel, the solid solution may extend from one to the other. But most systems have a succession of solid solutions and intermetallic compounds, as exemplified in Fig. 6. The ranges of the various phase fields almost always vary with temperature.
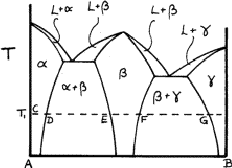 |
Figure 6 is called a phase diagram. The two elements are designated A and B, and near to A we can see that a solid solution ![]() of B in A is formed; at temperature T, this extends from C to D. At D
of B in A is formed; at temperature T, this extends from C to D. At D ![]() is saturated with B, and more of metal B causes a second phase
is saturated with B, and more of metal B causes a second phase ![]() to form; the two-phase region
to form; the two-phase region ![]() extends from D to E. Between E and F only
extends from D to E. Between E and F only ![]() is present, and from F to G there is another two-phase region
is present, and from F to G there is another two-phase region ![]() . Finally, there is another solid solution,
. Finally, there is another solid solution, ![]() , of A atoms in B.
, of A atoms in B.
The region ![]() may be so narrow that no variation of composition is observable;
may be so narrow that no variation of composition is observable; ![]() is almost a chemical compound. The various phase fields - single-phase and two-phase - usually vary with temperature and sometimes another structure appears at higher temperatures. The liquid L is such a phase, but we shall not deal with this phenomenon here; X-ray methods are of little use in dealing with liquids.
is almost a chemical compound. The various phase fields - single-phase and two-phase - usually vary with temperature and sometimes another structure appears at higher temperatures. The liquid L is such a phase, but we shall not deal with this phenomenon here; X-ray methods are of little use in dealing with liquids.
The object of metallographic research is to measure the extents of the various single-phase and two-phase regions at different temperatures.
The first step in examining alloys of two metals is to establish the structures of these metals; this is usually easy as metals often have one of the structures whose patterns are shown in Fig. 4. Then we examine how far the regions of solid solution extend. This we can do by taking photographs of alloys of different compositions near to the elements and seeing when extra lines of a new phase appear.
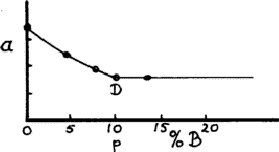
This however is only rough. To find accurately a point such as D, we plot a graph of lattice parameter a against composition (assuming that the structure is cubic), then measure the lattice parameter of the same phase in any two-phase alloy; in a two-phase region the compositions of the two phases are fixed and only the proportions change. The boundary point D is given by the point on the graph where the two-phase lattice parameter lies (Fig. 7).
To find the equivalents of the point D at different temperatures we must heat the alloy in bulk until equilibrium is attained. (The time needed would have to be found by trial and error - that is, by finding times that give consistent results.) Powder is then taken from the alloy, and this has to be annealed again at the same temperature to remove the effects of cold work (Section 1). The powder should be in a small container that can be suddenly plunged into cold water (quenched), with the hope that the high-temperature structure is preserved. No precise rules can be given as much depends upon the properties of the alloy system considered.
A more straightforward method is to take photographs at the required temperatures, but this requires specialized high-temperature cameras which may not be available. The quenching procedure should always be tried first.
There are many problems in this type of work, and no account can deal adequately with all of them. Finding the right conditions is usually a research in itself and X-ray methods can often help to shorten the time of investigation. For example, lack of equilibrium usually leads to broadened lines.
For alloys other than cubic the work is more complicated but the principles are the same. For a hexagonal structure two lattice parameters can be used and one can act as a check on the other. (It is hoped that they give the same answer!)
7. Ternary phase diagrams
For ternary alloys, two parameters are needed to define each composition and composition diagrams are therefore two-dimensional; no extra dimension is available for representing temperature. We therefore have to represent ternary results by a succession of diagrams, one for each temperature.
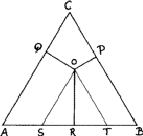
Compositions can be represented in an equilateral triangle; each corner represents an element, and each side a binary system; ternary compositions are represented by points within the triangle, the relative proportions of the elements being given by the lengths of the perpendiculars from the given point to the side of the triangle opposite the appropriate element (Fig. 8). In this figure the point O represents an alloy of 20% A, 30% B and 50% C.
This device is possible because the sum of such perpendiculars is independent of the position of the point, such as O (Fig. 8). We can see this by drawing lines - OS and OT - from O parallel to the sides. The length of AS is clearly (2/![]() )OQ and of BT is (2/
)OQ and of BT is (2/![]() )OP. The triangle OST is equilateral and therefore TS is equal to (2/
)OP. The triangle OST is equilateral and therefore TS is equal to (2/![]() )OR. The total length OP + OQ + OR is thus equal to
)OR. The total length OP + OQ + OR is thus equal to ![]() ) = AB, which is a constant.
) = AB, which is a constant.
 |
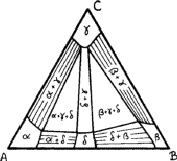
In ternary alloys, one, two or three phases can be in equilibrium at a general temperature. (At certain specific temperatures four can be in equilibrium.) Figure 9 shows three solid solutions - ![]() and
and ![]() - based upon elements A, B and C respectively and another solid solution,
- based upon elements A, B and C respectively and another solid solution, ![]() , based upon a binary compound of A and B; it also shows four two-phase regions and two three-phase regions.
, based upon a binary compound of A and B; it also shows four two-phase regions and two three-phase regions.
Within the two-phase regions only specific compositions can be in equilibrium; the lines joining these compositions are known as tie lines. The lines can be found by lattice-parameter methods similar to those used for binary alloys, but now it is necessary to find the variation of lattice parameter along the sides of the single-phase regions; measurement of the lattice parameters in a two-phase alloy should then give the compositions of phases in equilibrium.
There is no reason why tie-lines should behave as regularly as those shown in the region ![]() in Fig. 9; they can be irregular. There are thermodynamic reasons for supposing that this type of behaviour is more general.
in Fig. 9; they can be irregular. There are thermodynamic reasons for supposing that this type of behaviour is more general.
The boundaries between two-phase and three-phase regions must be straight lines, since they are tie lines; if they were not straight, points within the bows of the curves could not represent phases in equilibrium. Thus three-phase regions must be triangular, the corners representing compositions that are in equilibrium. The lattice parameters of the phases within three-phase regions must therefore be constant; only the proportions of the phases differ from point to point. This provides one way of checking that an alloy is three-phase, even if one of the phases is vanishingly small.
Diagrams are usually much more complicated than that shown in Fig. 9. Phases can occur that are not present in any of the binary systems and so will be represented by regions that do not reach the sides of the triangle. Thus, although it is necessary to begin an investigation of a ternary system by exploring the three binary systems, one must always be prepared to find new powder patterns arising.
 |
8. Quaternary and other systems
It is not possible to represent more than three components on a phase diagram and therefore quaternary and higher systems cannot be simply dealt with. No general rules can be given here, and each system will have to be studied separately. It is hoped however that the principles stated here will be helpful, but they cannot be more than that.
9. Miscellaneous problems
When X-ray methods were first introduced, it was hoped that they would clear up most of the problems raised by classical metallurgy. To a large extent they did so, but they exposed so many others that one eminent metallurgist said that they 'raised more problems than they solved'. This was intended as a criticism but it was really a compliment; X-rays were giving us a deeper insight into the solid state.
One early important result was the identification of the structures of iron. Cooling curves (Section 1) had shown discontinuities at 770![]() C, 910
C, 910![]() C and 1380
C and 1380![]() C and thus it was deduced that there were four solid phases, which were called
C and thus it was deduced that there were four solid phases, which were called ![]() (the lowest range),
(the lowest range), ![]() ,
,![]() and
and ![]() . X-ray diffraction showed however that
. X-ray diffraction showed however that ![]() and
and ![]() were identical - body-centred cubic - the discontinuity between them being caused by the change from ferromagnetism (
were identical - body-centred cubic - the discontinuity between them being caused by the change from ferromagnetism (![]() ) to paramagnetism (
) to paramagnetism (![]() ) at the Curie point. The
) at the Curie point. The ![]() phase is called ferrite,
phase is called ferrite, ![]() is called austenite (face-centred cubic) and
is called austenite (face-centred cubic) and ![]() is body-centred cubic again. This work was carried out with an iron wire as a specimen, heated by an electric current; the
is body-centred cubic again. This work was carried out with an iron wire as a specimen, heated by an electric current; the ![]() phase in pure iron cannot be retained by quenching (Section 6).
phase in pure iron cannot be retained by quenching (Section 6).
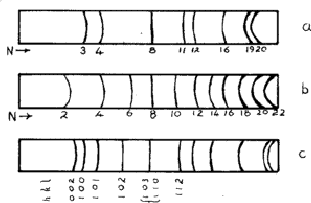
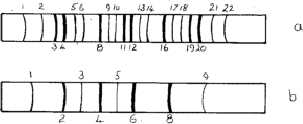
An unexpected effect was that produced by the diffusion of atoms into regular positions - the superlattices. Most solid solutions have atoms distributed at random on the available lattice positions, but sometimes after annealing - or even at room temperature - the atoms distribute themselves in a regular way. Thus an alloy of composition AuCu3 is face-centred cubic with gold and copper atoms sharing the lattice positions at random; but during annealing the atoms move so that no two gold atoms are neighbours and the structure can be described as having gold atoms at cube corners and the copper atoms at face centres. The structure is now essentially simple cubic and the exclusion rules (Section 4.1) no longer apply. Lines 1, 2, 5, 6![]() are now possible; these are called superlattice lines (Fig. 10a). They are weaker than the main lines because their intensities depend upon the difference between the scattering factors of Cu and Au.
are now possible; these are called superlattice lines (Fig. 10a). They are weaker than the main lines because their intensities depend upon the difference between the scattering factors of Cu and Au.
Superlattices are also possible in body-centred structures such as NiAl, the nickel atoms being at the corners and the aluminium atoms at the centres of the unit cell. The sequence of lines is shown in Fig. 10b.
 |
Superlattice lines are sometimes much broader than the main lines, suggesting that regions over which the superlattice is perfect are quite small. This effect has been studied for over fifty years: AuCu3 is probably easily the most photogenic X-ray specimen!
When the two atoms have nearly equal atomic numbers the superlattice lines are very weak; for CuZn (29 and 30) they would be impossible to detect. To find whether such a superlattice exists, Zn radiation was used; this depresses the scattering factor of Cu and makes the superlattice lines just detectable.
Sometimes a solid solution at high temperatures will break down into two solid solutions at lower temperatures, possibly one having a superlattice; this is called a solubility gap. This effect can be detected only by X-ray methods. Even then, it is not always obvious because the two phases must have the same structure and can be detected only by their different lattice parameters. The ability to detect small lattice parameter changes by high-angle lines (Section 5) is then very important.
Sometimes, a high-temperature structure will change into a related structure of lower symmetry as the temperature falls. (It is a general rule, rarely disobeyed, that a high-temperature structure cannot be of lower symmetry than a low-temperature structure.) This, again, can often be recognized only in the high-angle lines. For example, if a cubic structure becomes tetragonal, line 16 (400) will divide into two components (400 and 004) with slightly different spacings. Thus line 16 becomes double, with one component stronger than the other because 400 and 040 have the same spacing.
Lack of equilibrium is indicated by broadened lines, and this effect must always be eliminated, if possible, by annealing in the ingot form or in the powder. The ingot may not be uniform (coring) or the powder may have strains in it. Annealing may not always be effective, presumably because the ideal equilibrium reactions take place at temperatures too low for adequate diffusion to take place. It is thought that this is the reason why the Fe-Ni system has never been established, either by classical methods or by X-ray diffraction.
There are many other problems that could be discussed, and doubtless others that have not yet been uncovered. It is therefore necessary to keep a flexible mind to cope with any new phenomena that may arise; the general principles can be described as this article has attempted to show, but there is still room for completely new ideas to emerge.
References
International Tables for X-ray Crystallography, Birmingham, UK, Kynoch Press (1952).
Lipson, H. and Steeple, H., London, Macmillan (1970).


